<?xml version="1.0" encoding="utf-8"?><feed xmlns="http://www.w3.org/2005/Atom" xml:lang="zh-CN"><generator uri="https://jekyllrb.com/" version="4.3.4">Jekyll</generator><link href="https://zangcq.github.io/feed.xml" rel="self" type="application/atom+xml" /><link href="https://zangcq.github.io/" rel="alternate" type="text/html" hreflang="zh-CN" /><updated>2026-05-09T17:45:17+08:00</updated><id>https://zangcq.github.io/feed.xml</id><title type="html">Chuanqiz‘s Blog</title><subtitle>tech blog</subtitle><author><name>Chuanqi Zang</name></author><entry><title type="html">系统性能分析方法</title><link href="https://zangcq.github.io/performance/2026/02/14/%E7%B3%BB%E7%BB%9F%E6%80%A7%E8%83%BD%E5%88%86%E6%9E%90%E6%96%B9%E6%B3%95.html" rel="alternate" type="text/html" title="系统性能分析方法" /><published>2026-02-14T00:00:00+08:00</published><updated>2026-02-14T00:00:00+08:00</updated><id>https://zangcq.github.io/performance/2026/02/14/%E7%B3%BB%E7%BB%9F%E6%80%A7%E8%83%BD%E5%88%86%E6%9E%90%E6%96%B9%E6%B3%95</id><content type="html" xml:base="https://zangcq.github.io/performance/2026/02/14/%E7%B3%BB%E7%BB%9F%E6%80%A7%E8%83%BD%E5%88%86%E6%9E%90%E6%96%B9%E6%B3%95.html"><![CDATA[<blockquote>
  <p>今年是农历二零二五最后一天工作日，可以静下心来写点东西。</p>
</blockquote>

<p>最近半个月在查一些业务性能问题，从X86架构迁移到ARM架构，想借这个具体问题总结一下系统性能分析方法。</p>

<p>从最近一段时间的工作来看，主要有几个重点方面：</p>

<ol>
  <li>
    <p>首先<strong>检查环境配置是否一致</strong>，而配置又包含硬件和软件。</p>

    <ol>
      <li>当业务可用的硬件不一致时，可被调度的资源就会有偏差。举个例子，当一台服务器的核存比不一致时，尽管你的软件配置是一致的，在分布式计算引擎中，但是调度的Excutor数量会不一样。常见的服务器硬件一般包括CPU、内存、磁盘、网卡等。可以一一做检查。</li>
      <li>当我们提到软件配置，一般我们业务软件基本是一致的，包括软件版本、业务参数等等。需要注意的是，系统软件也很重要。例如Linux内核，它一般控制着硬件配置的参数，例如操作系统默认内存页的大小，主频是否可以超，超到多少等等。</li>
      <li>除了上面两条，NUMA配置我觉的需要单列一下，目前很多服务器都是高密机型，NUMA作为CPU硬件到软件一种映射，在计算场景也很重要。同时一些厂商在跨片访存的性能做的不是很好，Remote Memory Access和Local Memory Access 延迟差距很大，调度系统的绑核策略也值得关注。</li>
    </ol>
  </li>
  <li>
    <p>当所有的软硬件环境基本一致时，如何<strong>提取关键性能信息</strong>也很重要。</p>

    <ol>
      <li>首先是硬件监控，我们看监控的目的是<strong>观察业务资源使用情况如何，是否某些资源成为了瓶颈</strong>。主要是看一下是否有异常点，比如CPU利用率如何，观察cpu.sys是不是很高，如果cpu.sys高，大多往内核方向去看。除了CPU之外，也看看内存、磁盘、网络的使用情况，是不是被打满了。</li>
      <li>其次是业务现场的性能分析。CPU火焰图其实是一个很好的手段，它可以直观的抓取到业务正在执行的逻辑是什么。同时微架构的Topdown分析也很重要。TMA是英特尔先提出的一个方法论，聚合了一些PMU事件，最后得出一些结论。目前ARM架构也有类似工具的支持。</li>
    </ol>
  </li>
  <li>
    <p>当信息采集完成后，最重要的其实是<strong>抽取关键逻辑，复现问题场景</strong>。</p>

    <ol>
      <li>
        <p>当我们用火焰图抓取到业务逻辑时，我们其实就有了一个很好的逻辑抽取的范例。这次问题排查的关键进展也是在这里。一开始我就跟合作团队提出来复现的需求，但是他们没有立即去做这件事。后来我根据火焰图搞了一个简单的测试代码，基本确认了一个比较大性能差距点。</p>
      </li>
      <li>
        <p>抽取逻辑当然比较困难，想一比一复现是有些苛求的，但是我们最好要抓住重点。</p>
      </li>
    </ol>
  </li>
</ol>

<p>当我们有了一个可以复现小案例时，后续的工作也会比较容易开展了，今天就先到这里吧。</p>]]></content><author><name>Chuanqi Zang</name></author><category term="performance" /><category term="linux" /><category term="arm" /><category term="flamegraph" /><category term="tma" /><summary type="html"><![CDATA[从 X86 到 ARM 的业务迁移，系统性能问题排查的通用方法。]]></summary></entry><entry><title type="html">2025 年度总结</title><link href="https://zangcq.github.io/life/2025/12/31/2025%E5%B9%B4%E5%BA%A6%E6%80%BB%E7%BB%93.html" rel="alternate" type="text/html" title="2025 年度总结" /><published>2025-12-31T00:00:00+08:00</published><updated>2025-12-31T00:00:00+08:00</updated><id>https://zangcq.github.io/life/2025/12/31/2025%E5%B9%B4%E5%BA%A6%E6%80%BB%E7%BB%93</id><content type="html" xml:base="https://zangcq.github.io/life/2025/12/31/2025%E5%B9%B4%E5%BA%A6%E6%80%BB%E7%BB%93.html"><![CDATA[<blockquote>
  <p>自 zangcq.com 域名未续费后，也没在整理博客了，WordPress上面应该存着2016-2020年的一些文章，还没整理。</p>
</blockquote>

<p>简单做个年度总结，记录一下此时的感受。</p>

<ul>
  <li>生活上面
    <ul>
      <li>主要的重心是带娃，看着宝子慢慢长大，感受还是不太一样的。带娃儿比工作耗费精力高很多，这块儿lp付出的更多，感恩。</li>
      <li>年中，母亲检查发现有脑膜瘤，两个月都在这件事情上，好在姐从老家赶来，老丈人和丈母娘也来照顾娃，共克这段手忙脚乱的时光。</li>
      <li>今年也没咋出去玩儿，基本都是一个城市带个一两天（宁波、淮安、扬州）</li>
    </ul>
  </li>
  <li>工作上面
    <ul>
      <li>其实今年在业务上是有一定突破的，跟同事解决了几个关键问题。推动了Flink Java方向的JDK升级和优化的落地，合作关系也建立起来了。但是有两个同事离开了，有激励不到位的原因，也有一些其他原因，总之祝福吧。</li>
      <li>目前团队属于短小精干的状态，如何把有限的精力放到合适位置是很重要，明年希望做些技术突破的事情。</li>
      <li>今年是我比较重度使用AI Agent的一年，从MarsCode到AIME，从问答，到执行的转变，感觉产品力有质的提升。从代码理解上面来看，我的感受在7分左右，AIME类的执行Agent来看，简单任务做的很好，但是复杂情况偶尔能有一些惊喜的洞察，但是还不太够。</li>
    </ul>
  </li>
</ul>

<p>给明年立几个目标</p>

<ul class="task-list">
  <li class="task-list-item"><input type="checkbox" class="task-list-item-checkbox" disabled="disabled" />一次长途旅行和4次短途旅行</li>
  <li class="task-list-item"><input type="checkbox" class="task-list-item-checkbox" disabled="disabled" />读4本心理学/经济学方面的书籍</li>
  <li class="task-list-item"><input type="checkbox" class="task-list-item-checkbox" disabled="disabled" />每月写2篇高质量的技术文章</li>
</ul>

<p>writing is thinking，希望博客别长草~</p>]]></content><author><name>Chuanqi Zang</name></author><category term="life" /><category term="yearly-review" /><category term="thoughts" /><summary type="html"><![CDATA[2025 年的生活、工作与 AI Agent 使用感受。]]></summary></entry><entry><title type="html">build jekyll blog</title><link href="https://zangcq.github.io/blog/2025/04/03/HelloWorld.html" rel="alternate" type="text/html" title="build jekyll blog" /><published>2025-04-03T00:00:00+08:00</published><updated>2025-04-03T00:00:00+08:00</updated><id>https://zangcq.github.io/blog/2025/04/03/HelloWorld</id><content type="html" xml:base="https://zangcq.github.io/blog/2025/04/03/HelloWorld.html"><![CDATA[<p>之前技术博客使用WordPress，由于工作原因年久失修，最近使用jekyll通过gitpages来进行发布。</p>

<ol>
  <li>fork 一个jekyll模版</li>
  <li>构建 并且 运行</li>
</ol>

<div class="language-plaintext highlighter-rouge"><div class="highlight"><pre class="highlight"><code><table class="rouge-table"><tbody><tr><td class="rouge-gutter gl"><pre class="lineno">1
2
3
</pre></td><td class="rouge-code"><pre>bundle exec jekyll build

bundle exec jekyll serve
</pre></td></tr></tbody></table></code></pre></div></div>]]></content><author><name>Chuanqi Zang</name></author><category term="blog" /><category term="jekyll" /><category term="github-pages" /><summary type="html"><![CDATA[从 WordPress 迁到 Jekyll + GitHub Pages 的过程记录。]]></summary></entry><entry><title type="html">NVCC 分步编译</title><link href="https://zangcq.github.io/2020/08/13/nvcc-%E5%88%86%E6%AD%A5%E7%BC%96%E8%AF%91/" rel="alternate" type="text/html" title="NVCC 分步编译" /><published>2020-08-13T19:08:35+08:00</published><updated>2020-08-13T19:08:35+08:00</updated><id>https://zangcq.github.io/2020/08/13/nvcc</id><content type="html" xml:base="https://zangcq.github.io/2020/08/13/nvcc-%E5%88%86%E6%AD%A5%E7%BC%96%E8%AF%91/"><![CDATA[<p>先上一张大图，nviDIA官方文档的编译流程图</p>

<p><img src="/assets/images/legacy/nvcc-flow.png" alt="这里写图片描述" /> 
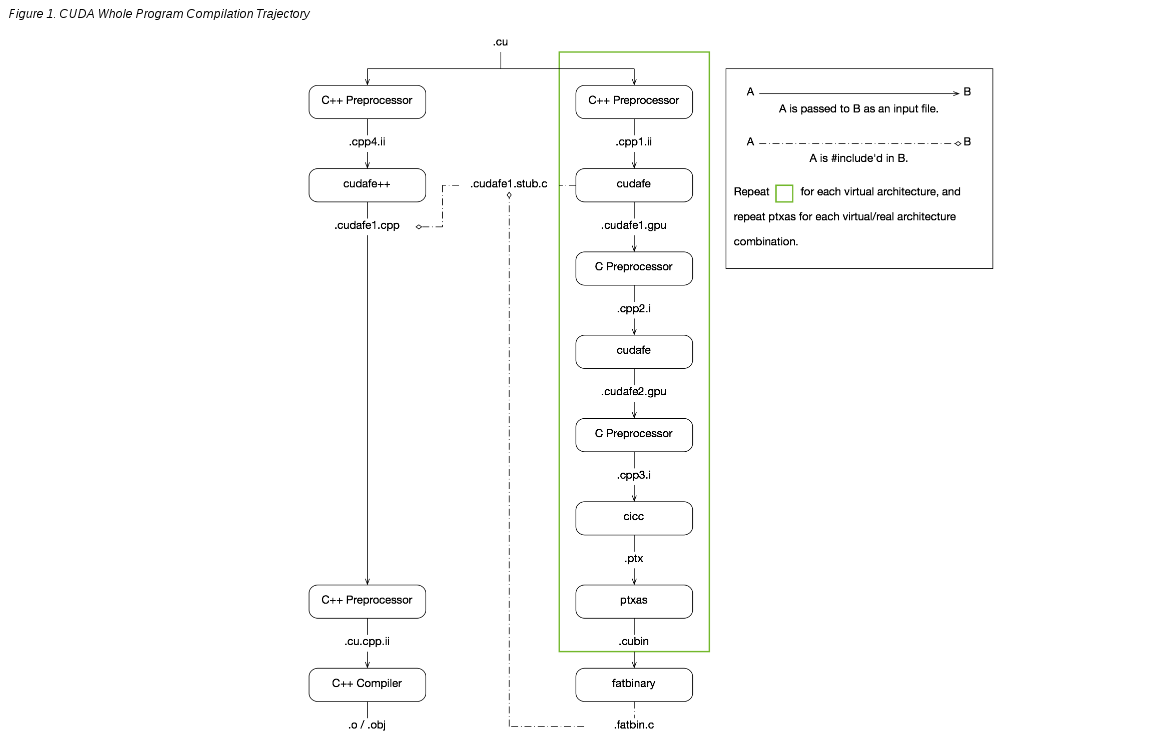
完整的说明了如何从一个 .cu or .cpp 生成一个可执行的文件。 1.只打印，不运行 <code class="language-plaintext highlighter-rouge">nvcc -O2 -c backprop_cuda.cu -keep -arch sm_30 --dryrun</code> 2.打印出 具体流程</p>
<div class="language-plaintext highlighter-rouge"><div class="highlight"><pre class="highlight"><code><table class="rouge-table"><tbody><tr><td class="rouge-gutter gl"><pre class="lineno">1
2
</pre></td><td class="rouge-code"><pre>    1. 读取环境变量

</pre></td></tr></tbody></table></code></pre></div></div>
<div class="language-plaintext highlighter-rouge"><div class="highlight"><pre class="highlight"><code><table class="rouge-table"><tbody><tr><td class="rouge-gutter gl"><pre class="lineno">1
2
3
4
5
6
7
8
9
10
11
12
13
14
15
16
</pre></td><td class="rouge-code"><pre>
    #$ _SPACE_=
    #$ _CUDART_=cudart
    #$ _HERE_=/home/gpgpu-sim/cuda/toolkit/4.2/cuda/bin
    #$ _THERE_=/home/gpgpu-sim/cuda/toolkit/4.2/cuda/bin
    #$ _TARGET_SIZE_=64
    #$ TOP=/home/gpgpu-sim/cuda/toolkit/4.2/cuda/bin/..
    #$ LD_LIBRARY_PATH=/home/gpgpu-sim/cuda/toolkit/4.2/cuda/bin/../lib:/home/gpgpu-sim/cuda/toolkit/4.2/cuda/bin/../extools/lib:/home/gpgpu-sim/gpgpu-sim_distribution/lib/gcc-4.6.4/cuda-4020/release:/home/gpgpu-sim/cuda/toolkit/4.2/cuda/lib64:
    #$ PATH=/home/gpgpu-sim/cuda/toolkit/4.2/cuda/bin/../open64/bin:/home/gpgpu-sim/cuda/toolkit/4.2/cuda/bin/../nvvm:/home/gpgpu-sim/cuda/toolkit/4.2/cuda/bin:/home/gpgpu-sim/gpgpu-sim_distribution/bin:/home/gpgpu-sim/cuda/toolkit/4.2/cuda/bin:/home/gpgpu-sim/gcc46/:/home/gpgpu-sim/cuda/toolkit/4.2/cuda/bin:/home/gpgpu-sim/bin:/usr/local/sbin:/usr/local/bin:/usr/sbin:/usr/bin:/sbin:/bin:/usr/games:/usr/local/games
    #$ INCLUDES="-I/home/gpgpu-sim/cuda/toolkit/4.2/cuda/bin/../include" "-I/home/gpgpu-sim/cuda/toolkit/4.2/cuda/bin/../include/cudart"
    #$ LIBRARIES=  "-L/home/gpgpu-sim/cuda/toolkit/4.2/cuda/bin/../lib64" -lcudart
    #$ CUDAFE_FLAGS=
    #$ OPENCC_FLAGS=
    #$ PTXAS_FLAGS=


</pre></td></tr></tbody></table></code></pre></div></div>

<p>以上是各种环境变量的读取，有的有，有的没有，那么从下面开始，就是上图中左侧绿框中的步骤了。</p>
<div class="language-plaintext highlighter-rouge"><div class="highlight"><pre class="highlight"><code><table class="rouge-table"><tbody><tr><td class="rouge-gutter gl"><pre class="lineno">1
2
3
4
</pre></td><td class="rouge-code"><pre>    2.使用c++ 预处理器进行预处理,生成中间文件 .cpp1.ii
     将一些定义好的枚举变量(例如cudaError)、struct(例如cuda的数据类型float4)、静态内联函数、extern "c++"和extern的函数、
     还重新定义了std命名空间、函数模板等内容写在main函数之前。

</pre></td></tr></tbody></table></code></pre></div></div>
<div class="language-plaintext highlighter-rouge"><div class="highlight"><pre class="highlight"><code><table class="rouge-table"><tbody><tr><td class="rouge-gutter gl"><pre class="lineno">1
2
3
4
</pre></td><td class="rouge-code"><pre>
    #$ gcc -D__CUDA_ARCH__=300 -E -x c++ -DCUDA_DOUBLE_MATH_FUNCTIONS  -D__CUDACC__  -O2 "-I/home/gpgpu-sim/cuda/toolkit/4.2/cuda/bin/../include" "-I/home/gpgpu-sim/cuda/toolkit/4.2/cuda/bin/../include/cudart"   -include "cuda_runtime.h" -m64 -o "backprop_cuda.cpp1.ii" "backprop_cuda.cu"


</pre></td></tr></tbody></table></code></pre></div></div>
<div class="language-plaintext highlighter-rouge"><div class="highlight"><pre class="highlight"><code><table class="rouge-table"><tbody><tr><td class="rouge-gutter gl"><pre class="lineno">1
2
3
</pre></td><td class="rouge-code"><pre>
    3.调用cudafe将分别执行在 host 和 device 上code 分离，生成.cudafe1.gpu

</pre></td></tr></tbody></table></code></pre></div></div>
<div class="language-plaintext highlighter-rouge"><div class="highlight"><pre class="highlight"><code><table class="rouge-table"><tbody><tr><td class="rouge-gutter gl"><pre class="lineno">1
2
3
</pre></td><td class="rouge-code"><pre>
    #$ cudafe --m64 --gnu_version=40604 -tused --no_remove_unneeded_entities  --gen_c_file_name "backprop_cuda.cudafe1.c" --stub_file_name "backprop_cuda.cudafe1.stub.c" --gen_device_file_name "backprop_cuda.cudafe1.gpu" --include_file_name "backprop_cuda.fatbin.c" "backprop_cuda.cpp1.ii"

</pre></td></tr></tbody></table></code></pre></div></div>
<div class="language-plaintext highlighter-rouge"><div class="highlight"><pre class="highlight"><code><table class="rouge-table"><tbody><tr><td class="rouge-gutter gl"><pre class="lineno">1
2
3
</pre></td><td class="rouge-code"><pre>
    4.使用c 预处理器进行预处理，生成中间文件 .cpp2.i

</pre></td></tr></tbody></table></code></pre></div></div>
<div class="language-plaintext highlighter-rouge"><div class="highlight"><pre class="highlight"><code><table class="rouge-table"><tbody><tr><td class="rouge-gutter gl"><pre class="lineno">1
2
3
</pre></td><td class="rouge-code"><pre>
    #$ gcc -D__CUDA_ARCH__=300 -E -x c -DCUDA_DOUBLE_MATH_FUNCTIONS  -D__CUDACC__  -O2 -D__CUDA_PREC_DIV -D__CUDA_PREC_SQRT "-I/home/gpgpu-sim/cuda/toolkit/4.2/cuda/bin/../include" "-I/home/gpgpu-sim/cuda/toolkit/4.2/cuda/bin/../include/cudart"   -m64 -o "backprop_cuda.cpp2.i" "backprop_cuda.cudafe1.gpu"

</pre></td></tr></tbody></table></code></pre></div></div>
<div class="language-plaintext highlighter-rouge"><div class="highlight"><pre class="highlight"><code><table class="rouge-table"><tbody><tr><td class="rouge-gutter gl"><pre class="lineno">1
2
3
</pre></td><td class="rouge-code"><pre>
    5.继续使用cudafe进行分离？

</pre></td></tr></tbody></table></code></pre></div></div>
<div class="language-plaintext highlighter-rouge"><div class="highlight"><pre class="highlight"><code><table class="rouge-table"><tbody><tr><td class="rouge-gutter gl"><pre class="lineno">1
2
3
4
</pre></td><td class="rouge-code"><pre>
    #$ cudafe -w --m64 --gnu_version=40604 --c  --gen_c_file_name "backprop_cuda.cudafe2.c" --stub_file_name "backprop_cuda.cudafe2.stub.c" --gen_device_file_name "backprop_cuda.cudafe2.gpu" --include_file_name "backprop_cuda.fatbin.c" "backprop_cuda.cpp2.i"


</pre></td></tr></tbody></table></code></pre></div></div>
<div class="language-plaintext highlighter-rouge"><div class="highlight"><pre class="highlight"><code><table class="rouge-table"><tbody><tr><td class="rouge-gutter gl"><pre class="lineno">1
2
3
</pre></td><td class="rouge-code"><pre>
    6.预处理，因为不同架构gpu的计算能力不同，那么需要进行相应的处理

</pre></td></tr></tbody></table></code></pre></div></div>
<div class="language-plaintext highlighter-rouge"><div class="highlight"><pre class="highlight"><code><table class="rouge-table"><tbody><tr><td class="rouge-gutter gl"><pre class="lineno">1
2
3
4
</pre></td><td class="rouge-code"><pre>
    #$ gcc -D__CUDA_ARCH__=300 -E -x c -DCUDA_DOUBLE_MATH_FUNCTIONS  -D__CUDABE__ -D__CUDANVVM__  -O2 -D__CUDA_PREC_DIV -D__CUDA_PREC_SQRT "-I/home/gpgpu-sim/cuda/toolkit/4.2/cuda/bin/../include" "-I/home/gpgpu-sim/cuda/toolkit/4.2/cuda/bin/../include/cudart"   -m64 -o "backprop_cuda.cpp3.i" "backprop_cuda.cudafe2.gpu"


</pre></td></tr></tbody></table></code></pre></div></div>
<div class="language-plaintext highlighter-rouge"><div class="highlight"><pre class="highlight"><code><table class="rouge-table"><tbody><tr><td class="rouge-gutter gl"><pre class="lineno">1
2
3
</pre></td><td class="rouge-code"><pre>
    7.filehash？

</pre></td></tr></tbody></table></code></pre></div></div>
<div class="language-plaintext highlighter-rouge"><div class="highlight"><pre class="highlight"><code><table class="rouge-table"><tbody><tr><td class="rouge-gutter gl"><pre class="lineno">1
2
3
4
</pre></td><td class="rouge-code"><pre>
    #$ filehash -s " " "backprop_cuda.cpp3.i" &gt; "backprop_cuda.hash"


</pre></td></tr></tbody></table></code></pre></div></div>
<div class="language-plaintext highlighter-rouge"><div class="highlight"><pre class="highlight"><code><table class="rouge-table"><tbody><tr><td class="rouge-gutter gl"><pre class="lineno">1
2
3
</pre></td><td class="rouge-code"><pre>
    8.c++预处理？

</pre></td></tr></tbody></table></code></pre></div></div>
<div class="language-plaintext highlighter-rouge"><div class="highlight"><pre class="highlight"><code><table class="rouge-table"><tbody><tr><td class="rouge-gutter gl"><pre class="lineno">1
2
3
4
</pre></td><td class="rouge-code"><pre>
    #$ gcc -E -x c++ -D__CUDACC__  -O2 "-I/home/gpgpu-sim/cuda/toolkit/4.2/cuda/bin/../include" "-I/home/gpgpu-sim/cuda/toolkit/4.2/cuda/bin/../include/cudart"   -include "cuda_runtime.h" -m64 -o "backprop_cuda.cpp4.ii" "backprop_cuda.cu"


</pre></td></tr></tbody></table></code></pre></div></div>
<div class="language-plaintext highlighter-rouge"><div class="highlight"><pre class="highlight"><code><table class="rouge-table"><tbody><tr><td class="rouge-gutter gl"><pre class="lineno">1
2
3
</pre></td><td class="rouge-code"><pre>
    9.将中间文件进一步分离？，生成ptx文件

</pre></td></tr></tbody></table></code></pre></div></div>
<div class="language-plaintext highlighter-rouge"><div class="highlight"><pre class="highlight"><code><table class="rouge-table"><tbody><tr><td class="rouge-gutter gl"><pre class="lineno">1
2
3
4
</pre></td><td class="rouge-code"><pre>
    #$ cudafe++ --m64 --gnu_version=40604 --parse_templates  --gen_c_file_name "backprop_cuda.cudafe1.cpp" --stub_file_name "backprop_cuda.cudafe1.stub.c" "backprop_cuda.cpp4.ii"
    #$ cicc  -arch compute_30 -m64 -ftz=0 -prec_div=1 -prec_sqrt=1 -fmad=1 "backprop_cuda" "backprop_cuda.cpp3.i"  -o "backprop_cuda.ptx"

</pre></td></tr></tbody></table></code></pre></div></div>
<div class="language-plaintext highlighter-rouge"><div class="highlight"><pre class="highlight"><code><table class="rouge-table"><tbody><tr><td class="rouge-gutter gl"><pre class="lineno">1
2
3
4
</pre></td><td class="rouge-code"><pre>
    10.将ptx，编译成.cubin
    PTX离线编译,将代码编译成一个确定的计算能力和SM版本，对应的版本信息保存在cubin中。

</pre></td></tr></tbody></table></code></pre></div></div>
<div class="language-plaintext highlighter-rouge"><div class="highlight"><pre class="highlight"><code><table class="rouge-table"><tbody><tr><td class="rouge-gutter gl"><pre class="lineno">1
2
3
</pre></td><td class="rouge-code"><pre>
    #$ ptxas  -arch=sm_30 -m64  "backprop_cuda.ptx"  -o "backprop_cuda.sm_30.cubin"

</pre></td></tr></tbody></table></code></pre></div></div>
<div class="language-plaintext highlighter-rouge"><div class="highlight"><pre class="highlight"><code><table class="rouge-table"><tbody><tr><td class="rouge-gutter gl"><pre class="lineno">1
2
3
4
</pre></td><td class="rouge-code"><pre>
    11.将.cubin编译成 .fatbin/fatbin.c
    PTX在线编译，是将cubin和ptx中的版本信息保存在fatbin中。

</pre></td></tr></tbody></table></code></pre></div></div>
<div class="language-plaintext highlighter-rouge"><div class="highlight"><pre class="highlight"><code><table class="rouge-table"><tbody><tr><td class="rouge-gutter gl"><pre class="lineno">1
2
3
</pre></td><td class="rouge-code"><pre>
    #$ fatbinary --create="backprop_cuda.fatbin" --key="xxxxxxxxxx" --ident="backprop_cuda.cu" -cuda "--image=profile=compute_30,file=backprop_cuda.ptx" "--image=profile=sm_30,file=backprop_cuda.sm_30.cubin" --embedded-fatbin="backprop_cuda.fatbin.c"

</pre></td></tr></tbody></table></code></pre></div></div>
<div class="language-plaintext highlighter-rouge"><div class="highlight"><pre class="highlight"><code><table class="rouge-table"><tbody><tr><td class="rouge-gutter gl"><pre class="lineno">1
2
3
</pre></td><td class="rouge-code"><pre>
    12.再进行预处理

</pre></td></tr></tbody></table></code></pre></div></div>
<div class="language-plaintext highlighter-rouge"><div class="highlight"><pre class="highlight"><code><table class="rouge-table"><tbody><tr><td class="rouge-gutter gl"><pre class="lineno">1
2
3
4
</pre></td><td class="rouge-code"><pre>
     #$ gcc -D__CUDA_ARCH__=300 -E -x c++ -DCUDA_DOUBLE_MATH_FUNCTIONS   -O2 -D__CUDA_PREC_DIV -D__CUDA_PREC_SQRT "-I/home/gpgpu-sim/cuda/toolkit/4.2/cuda/bin/../include" "-I/home/gpgpu-sim/cuda/toolkit/4.2/cuda/bin/../include/cudart"   -m64 -o "backprop_cuda.cu.cpp.ii" "backprop_cuda.cudafe1.cpp"


</pre></td></tr></tbody></table></code></pre></div></div>
<div class="language-plaintext highlighter-rouge"><div class="highlight"><pre class="highlight"><code><table class="rouge-table"><tbody><tr><td class="rouge-gutter gl"><pre class="lineno">1
2
3
</pre></td><td class="rouge-code"><pre>
    13.用c++编译器继续编译，生成.o

</pre></td></tr></tbody></table></code></pre></div></div>
<div class="language-plaintext highlighter-rouge"><div class="highlight"><pre class="highlight"><code><table class="rouge-table"><tbody><tr><td class="rouge-gutter gl"><pre class="lineno">1
2
3
</pre></td><td class="rouge-code"><pre>
    #$ gcc -c -x c++ -O2 "-I/home/gpgpu-sim/cuda/toolkit/4.2/cuda/bin/../include" "-I/home/gpgpu-sim/cuda/toolkit/4.2/cuda/bin/../include/cudart"   -fpreprocessed -m64 -o "backprop_cuda.o" "backprop_cuda.cu.cpp.ii"

</pre></td></tr></tbody></table></code></pre></div></div>
<div class="language-plaintext highlighter-rouge"><div class="highlight"><pre class="highlight"><code><table class="rouge-table"><tbody><tr><td class="rouge-gutter gl"><pre class="lineno">1
2
3
</pre></td><td class="rouge-code"><pre>
    14.最后 用 gcc 将 所有的.o 链接，生成可执行文件

</pre></td></tr></tbody></table></code></pre></div></div>
<div class="language-plaintext highlighter-rouge"><div class="highlight"><pre class="highlight"><code><table class="rouge-table"><tbody><tr><td class="rouge-gutter gl"><pre class="lineno">1
2
3
</pre></td><td class="rouge-code"><pre>
    gcc -g  -O2 backprop.o facetrain.o imagenet.o backprop_cuda.o -o backprop -L/home/gpgpu-sim/cuda/toolkit/4.2/cuda/lib64 -lcudart -lm

</pre></td></tr></tbody></table></code></pre></div></div>]]></content><author><name>Chuanqi Zang</name></author><category term="GPGPU" /><summary type="html"><![CDATA[先上一张大图，nviDIA官方文档的编译流程图]]></summary></entry><entry><title type="html">TVM 跑通TF 模型</title><link href="https://zangcq.github.io/2020/08/07/tvm-%E8%B7%91%E9%80%9Atf-%E6%A8%A1%E5%9E%8B/" rel="alternate" type="text/html" title="TVM 跑通TF 模型" /><published>2020-08-07T22:44:34+08:00</published><updated>2020-08-07T22:44:34+08:00</updated><id>https://zangcq.github.io/2020/08/07/tvm-tf</id><content type="html" xml:base="https://zangcq.github.io/2020/08/07/tvm-%E8%B7%91%E9%80%9Atf-%E6%A8%A1%E5%9E%8B/"><![CDATA[<h1 id="0-参考文献">0. 参考文献</h1>

<ul>
  <li>官方文档</li>
</ul>

<blockquote>
  <p><a href="https://tvm.apache.org/docs/tutorials/frontend/from_tensorflow.html#sphx-glr-tutorials-frontend-from-tensorflow-py">https://tvm.apache.org/docs/tutorials/frontend/from_tensorflow.html#sphx-glr-tutorials-frontend-from-tensorflow-py</a></p>
</blockquote>

<ul>
  <li>AML 库</li>
</ul>

<blockquote>
  <p><a href="https://code.byted.org/lagrange/tvm_tune">https://code.byted.org/lagrange/tvm_tune</a></p>
</blockquote>

<h1 id="1-overview">1. Overview</h1>

<ul>
  <li>
    <p>前提条件，安装<a href="https://www.tensorflow.org/install">tensorflow</a> ，版本1.15</p>
  </li>
  <li>
    <p>下边是我 pip list 中相关与tvm和TensorFlow的各种依赖包列表，可以跑通。方便大家对照查看。</p>
  </li>
</ul>

<p>不支持在 Doc 外粘贴 block</p>
<ul>
  <li>
    <p>根据官方文档的介绍，我用 processon 画一个流程图，来方便理解。</p>
  </li>
  <li>
    <p>名词解释</p>

    <ul>
      <li>
        <p><strong>pb</strong></p>

        <ul>
          <li>Protobuf 类型的模型文件，一般用TensorFlow训练生成</li>
        </ul>
      </li>
      <li>
        <p><strong>pbtxt</strong></p>

        <ul>
          <li>文本文件，描述模型结构，人类可读，可以用一些可视化工具来查看</li>
        </ul>
      </li>
      <li>
        <p><strong>np.array</strong></p>

        <ul>
          <li>Numpy 的数组</li>
        </ul>
      </li>
      <li>
        <p><strong>mod</strong> (<em>tvm.IRModule</em>) – The module that optimizations will be performed on.</p>

        <ul>
          <li>TVM 的中间表示，所有的优化都在这上边做</li>
        </ul>
      </li>
      <li>
        <p><strong>params</strong> (<em>dict of str to tvm.nd.NDArray</em>) – Dict of converted parameters stored in tvm.nd.NDArray format</p>

        <ul>
          <li>存储参数的数据结构，在auto tune的时候，就调节它</li>
        </ul>
      </li>
      <li>
        <p><strong>relay.build</strong> 图优化就在这个阶段做</p>

        <ul>
          <li>
            <p><strong>graph_json</strong> (<em>str</em>) – The json string that can be accepted by graph runtime.</p>

            <ul>
              <li>在运行时可以读取</li>
            </ul>
          </li>
          <li>
            <p><strong>mod</strong> (<em>tvm.Module</em>) – The module containing necessary libraries.</p>

            <ul>
              <li>包含了运行所需要的库</li>
            </ul>
          </li>
          <li>
            <p><strong>params</strong> (<em>dict</em>) – The parameters of the final graph.</p>

            <ul>
              <li>存贮图最终的参数</li>
            </ul>
          </li>
        </ul>
      </li>
    </ul>
  </li>
</ul>

<h1 id="2-实际运行">2. 实际运行</h1>

<p>运行一个 tvm_tune的demo</p>
<div class="language-plaintext highlighter-rouge"><div class="highlight"><pre class="highlight"><code><table class="rouge-table"><tbody><tr><td class="rouge-gutter gl"><pre class="lineno">1
2
3
4
5
6
7
8
</pre></td><td class="rouge-code"><pre>     # https://code.byted.org/lagrange/tvm_tune
    # 代码库下载
    git clone git@code.byted.org:lagrange/tvm_tune.git
    # 切换到对应分支
    git checkout tf_pipeline
    cd tvm_tune/tools
    python tune_frozen_graph.py

</pre></td></tr></tbody></table></code></pre></div></div>

<h2 id="在cpu-上运行">在<strong>CPU</strong> 上运行</h2>

<div class="language-plaintext highlighter-rouge"><div class="highlight"><pre class="highlight"><code><table class="rouge-table"><tbody><tr><td class="rouge-gutter gl"><pre class="lineno">1
</pre></td><td class="rouge-code"><pre> 1. 微调一下代码
</pre></td></tr></tbody></table></code></pre></div></div>

<div class="language-plaintext highlighter-rouge"><div class="highlight"><pre class="highlight"><code><table class="rouge-table"><tbody><tr><td class="rouge-gutter gl"><pre class="lineno">1
2
3
4
5
6
7
8
9
10
11
12
13
14
15
16
17
18
19
20
21
22
23
24
25
26
27
28
29
30
31
32
33
34
35
36
37
38
</pre></td><td class="rouge-code"><pre>
    diff --git a/tools/tune_frozen_graph.py b/tools/tune_frozen_graph.py
    index 1ca63ed..ad5d252 100644
    --- a/tools/tune_frozen_graph.py
    +++ b/tools/tune_frozen_graph.py
    @@ -23,11 +23,14 @@ from tvm.contrib.util import tempdir
     #### TUNING OPTION ####
    -target = tvm.target.cuda("unknown", "-libs=cudnn,cublas")
    +# target = tvm.target.cuda("unknown", "-libs=cudnn,cublas")
    +target = tvm.target.cuda("unknown", "")
     print(target)
     network = 'bertmatch'
     log_file = "%s.log" % network
    +print ("chuanqiz")
    +print (log_file)
     tuning_option = {
       'log_filename': log_file,
    @@ -224,15 +227,15 @@ if __name__ == "__main__":
       print(tf_res)
       export_path = "./tvm_export"
    -   # mod, params = convert_tf_to_tvm(sess, input_names, input_shapes, output_names)
    +   mod, params = convert_tf_to_tvm(sess, input_names, input_shapes, output_names)
       # print(mod["main"])
       #
    -   # # tvm_res = run_tvm(mod, params, feed_dict, output_shapes)
    -   # module = tune_and_evaluate(mod, tuning_option, params, export_path, skip_tune=True)
    -   # tvm_res = run_tvm(module, None, feed_dict, output_shapes)
    +   tvm_res = run_tvm(mod, params, feed_dict, output_shapes)
    +   module = tune_and_evaluate(mod, tuning_option, params, export_path, skip_tune=True)
    +   tvm_res = run_tvm(module, None, feed_dict, output_shapes)
       #
    -   # print(tf_res, tvm_res)
    -   # print(np.allclose(tf_res, tvm_res, rtol=1.e-3, atol=1.e-4))
    +   print(tf_res, tvm_res)
    +   print(np.allclose(tf_res, tvm_res, rtol=1.e-3, atol=1.e-4))
       # tvm tuned module export to tensorflow op
       export_tf_res = tvm_export_to_tensorflow(export_path, feed_dict, fetch_dict)

</pre></td></tr></tbody></table></code></pre></div></div>

<ul>
  <li>运行log留存，便于对比</li>
</ul>

<h2 id="在gpu-上运行">在<strong>GPU</strong> 上运行</h2>

<div class="language-plaintext highlighter-rouge"><div class="highlight"><pre class="highlight"><code><table class="rouge-table"><tbody><tr><td class="rouge-gutter gl"><pre class="lineno">1
</pre></td><td class="rouge-code"><pre> 1. 要把 +# target = tvm.target.cuda("unknown", "-libs=cudnn,cublas")这行代码打开
</pre></td></tr></tbody></table></code></pre></div></div>

<div class="language-plaintext highlighter-rouge"><div class="highlight"><pre class="highlight"><code><table class="rouge-table"><tbody><tr><td class="rouge-gutter gl"><pre class="lineno">1
2
3
4
5
6
7
8
</pre></td><td class="rouge-code"><pre>
    zangchuanqi@n22-145-158:~/workspace/tvm_tune/tools$ diff tune_frozen_graph_gpu.py tune_frozen_graph.py
    26c26,27
    &lt; target = tvm.target.cuda("unknown", "-libs=cudnn,cublas")
    ---
    &gt; # target = tvm.target.cuda("unknown", "-libs=cudnn,cublas")
    &gt; target = tvm.target.cuda("unknown", "")

</pre></td></tr></tbody></table></code></pre></div></div>

<div class="language-plaintext highlighter-rouge"><div class="highlight"><pre class="highlight"><code><table class="rouge-table"><tbody><tr><td class="rouge-gutter gl"><pre class="lineno">1
</pre></td><td class="rouge-code"><pre> 1. 重新编译 tvm ， 修改 config.cmake 文件
</pre></td></tr></tbody></table></code></pre></div></div>

<div class="language-plaintext highlighter-rouge"><div class="highlight"><pre class="highlight"><code><table class="rouge-table"><tbody><tr><td class="rouge-gutter gl"><pre class="lineno">1
2
3
4
5
6
7
8
9
10
11
12
</pre></td><td class="rouge-code"><pre>
    zangchuanqi@n22-145-158:~/workspace/tvm$ diff config.cmake build/config.cmake
    173c173
    &lt; set(USE_CUDNN OFF)
    ---
    &gt; set(USE_CUDNN ON)
    176c176
    &lt; set(USE_CUBLAS OFF)
    ---
    &gt; set(USE_CUBLAS ON)
    227,229d226

</pre></td></tr></tbody></table></code></pre></div></div>

<ul>
  <li>log留存</li>
</ul>

<h2 id="需要安装的一些依赖">需要安装的一些依赖</h2>

<ul>
  <li>Import tensorflow as tf</li>
</ul>

<div class="language-plaintext highlighter-rouge"><div class="highlight"><pre class="highlight"><code><table class="rouge-table"><tbody><tr><td class="rouge-gutter gl"><pre class="lineno">1
2
3
</pre></td><td class="rouge-code"><pre>
    pip install tensorflow

</pre></td></tr></tbody></table></code></pre></div></div>

<ul>
  <li>ImportError: No module named PIL</li>
</ul>

<div class="language-plaintext highlighter-rouge"><div class="highlight"><pre class="highlight"><code><table class="rouge-table"><tbody><tr><td class="rouge-gutter gl"><pre class="lineno">1
2
3
</pre></td><td class="rouge-code"><pre>
    pip install Pillow

</pre></td></tr></tbody></table></code></pre></div></div>

<ul>
  <li>
    <p>Graph 读入部分，借助TF和pytorch的依赖</p>

    <ul>
      <li>
        <p>需要安装 tf 和 torch</p>

        <ul>
          <li>
            <p>出现问题，使用 包管理器安装时，由于网络原因无法安装，因此下载 whl，手动安装</p>
          </li>
          <li>
            <p>或者添加代理，搞定网络问题</p>
          </li>
          <li>
            <p>使用docker 镜像，安装对应环境</p>
          </li>
        </ul>
      </li>
    </ul>
  </li>
</ul>

<h1 id="3-运行时出现的小问题">3. 运行时出现的小问题</h1>

<ul>
  <li>Warning 缺少llvm ，是否需要安装？</li>
</ul>

<div class="language-plaintext highlighter-rouge"><div class="highlight"><pre class="highlight"><code><table class="rouge-table"><tbody><tr><td class="rouge-gutter gl"><pre class="lineno">1
2
3
</pre></td><td class="rouge-code"><pre>
    WARNING:autotvm:Cannot find config for target=llvm, workload=('dense_nopack.x86', ('TENSOR', (1, 2048), 'float32'), ('TENSOR', (1008, 2048), 'float32'), None, 'float32'). A fallback c    onfiguration is used, which may bring great performance regression.

</pre></td></tr></tbody></table></code></pre></div></div>

<ul>
  <li>block住了, python 语法问题？</li>
</ul>

<div class="language-plaintext highlighter-rouge"><div class="highlight"><pre class="highlight"><code><table class="rouge-table"><tbody><tr><td class="rouge-gutter gl"><pre class="lineno">1
2
3
4
5
6
7
</pre></td><td class="rouge-code"><pre>
    Tensorflow protobuf imported to relay frontend.
    Traceback (most recent call last):
     File "from_tensorflow.py", line 158, in &lt;module&gt;
      m = graph_runtime.GraphModule(lib["default"](ctx))
    TypeError: tuple indices must be integers or slices, not str

</pre></td></tr></tbody></table></code></pre></div></div>

<ul>
  <li>TensorFlow中node不合法？</li>
</ul>

<div class="language-plaintext highlighter-rouge"><div class="highlight"><pre class="highlight"><code><table class="rouge-table"><tbody><tr><td class="rouge-gutter gl"><pre class="lineno">1
2
3
4
5
6
7
8
9
10
11
12
13
14
15
16
17
</pre></td><td class="rouge-code"><pre>
    WARNING:tensorflow:From /data01/zangchuanqi/workspace/tvm/python/tvm/relay/testing/tf.py:153: The name tf.logging.fatal is deprecated. Please use tf.compat.v1.logging.fatal instead.
    CRITICAL:tensorflow:Failed to locate: n01440764
    Traceback (most recent call last):
     File "tf.py", line 146, in &lt;module&gt;
      run_inference_on_image(img_path)
     File "tf.py", line 136, in run_inference_on_image
      uid_lookup_path=label_path)
     File "/data01/zangchuanqi/workspace/tvm/python/tvm/relay/testing/tf.py", line 105, in __init__
      self.node_lookup = self.load(label_lookup_path, uid_lookup_path)
     File "/data01/zangchuanqi/workspace/tvm/python/tvm/relay/testing/tf.py", line 154, in load
      name = uid_to_human[val]
    KeyError: 'n01440764'
    (tvm.venv) zangchuanqi@n22-145-158:~/workspace/test$ cat  /data01/zangchuanqi/.tvm_test_data/data/imagenet_2012_challenge_label_map_proto.pbtxt | grep n01440764
     target_class_string: "n01440764"
    (tvm.venv) zangchuanqi@n22-145-158:~/workspace/test$

</pre></td></tr></tbody></table></code></pre></div></div>]]></content><author><name>Chuanqi Zang</name></author><category term="机器学习" /><summary type="html"><![CDATA[0. 参考文献]]></summary></entry><entry><title type="html">TensorFlow 源码编译</title><link href="https://zangcq.github.io/2020/08/07/tensorflow-%E6%BA%90%E7%A0%81%E7%BC%96%E8%AF%91/" rel="alternate" type="text/html" title="TensorFlow 源码编译" /><published>2020-08-07T22:38:37+08:00</published><updated>2020-08-07T22:38:37+08:00</updated><id>https://zangcq.github.io/2020/08/07/tensorflow</id><content type="html" xml:base="https://zangcq.github.io/2020/08/07/tensorflow-%E6%BA%90%E7%A0%81%E7%BC%96%E8%AF%91/"><![CDATA[<p>TensorFlow 源码编译构建 大型工程编译坑还是太多，这波先把坑给大家踩一踩。</p>

<h1 id="reference">Reference</h1>

<p>主要参考tensorflow官方网站和自己之前的一些经验吧。</p>

<blockquote>
  <p><a href="https://www.tensorflow.org/install/source">https://www.tensorflow.org/install/source</a></p>
</blockquote>

<p>这次主要是在物理机上搞的，既然公司有容器化的战略，那么下一步全部上容器，云化。</p>

<h1 id="依赖安装">依赖安装</h1>

<p>像tensorflow这种工程的安装，主要是版本依赖的问题居多，那么我先把我在版本依赖的坑写一下。</p>

<ul>
  <li>
    <p>Python 版本 3.6.9</p>
  </li>
  <li>
    <p>Pip list</p>
  </li>
</ul>

<ol>
  <li>
    <ol>
      <li>Numpy 1.19.1</li>
    </ol>
  </li>
  <li>
    <ol>
      <li>Wheel 0.34.2</li>
    </ol>
  </li>
</ol>

<p>不支持在 Doc 外粘贴 block<strong>参考一下我的配置</strong></p>

<ul>
  <li>
    <p>Bazel 版本</p>
  </li>
  <li>
    <p>我刚开始用了 0.24.1, 有些坑，后来改成0.26.1搞定了。</p>
  </li>
  <li>
    <p>Tensorflow 用 bazel来做构造工具，其性质跟 blade是一样的。</p>
  </li>
</ul>

<ol>
  <li>
    <ul>
      <li>我们可以通过 cat 一下 configure.py 这个文件来查看一下，你需要哪个版本，然后对应安装即可。</li>
    </ul>
  </li>
</ol>

<div class="language-plaintext highlighter-rouge"><div class="highlight"><pre class="highlight"><code><table class="rouge-table"><tbody><tr><td class="rouge-gutter gl"><pre class="lineno">1
2
3
4
5
6
</pre></td><td class="rouge-code"><pre>
    cd tensorflow
    cat configure.py | grep BAZEL_VERSION
    _TF_MIN_BAZEL_VERSION = '0.24.1'
    _TF_MAX_BAZEL_VERSION = '0.26.1'

</pre></td></tr></tbody></table></code></pre></div></div>

<ol>
  <li>
    <ul>
      <li>直接到release网页下载下来，然后进行安装，（服务器可能会预装 bazel，但是版本可能会有点高）</li>
    </ul>
  </li>
</ol>

<div class="language-plaintext highlighter-rouge"><div class="highlight"><pre class="highlight"><code><table class="rouge-table"><tbody><tr><td class="rouge-gutter gl"><pre class="lineno">1
2
3
4
5
</pre></td><td class="rouge-code"><pre>
    https://github.com/bazelbuild/bazel/releases
    https://github.com/bazelbuild/bazel/releases/tag/0.26.1
    wget https://github.com/bazelbuild/bazel/releases/download/0.26.1/bazel-0.26.1-installer-linux-x86_64.sh

</pre></td></tr></tbody></table></code></pre></div></div>

<ol>
  <li>
    <ul>
      <li>然后把bazel 安装在自己的目录，使能一下PATH</li>
    </ul>
  </li>
</ol>

<div class="language-plaintext highlighter-rouge"><div class="highlight"><pre class="highlight"><code><table class="rouge-table"><tbody><tr><td class="rouge-gutter gl"><pre class="lineno">1
2
3
4
5
</pre></td><td class="rouge-code"><pre>
    chmod a+x bazel-0.24.1-installer-linux-x86_64.sh
    ./bazel-0.24.1-installer-linux-x86_64.sh --prefix=/path/to/you
    export PATH=/data01/zangchuanqi/bin:$PATH

</pre></td></tr></tbody></table></code></pre></div></div>

<ul>
  <li>
    <p>GCC 版本</p>
  </li>
  <li>
    <ul>
      <li>GCC 版本也有点曲折，之前用的是4.9.2也就是系统默认版本</li>
    </ul>
  </li>
  <li>
    <ul>
      <li>但是中间eigen（CPU线性代数加速库）需要5.x以上的版本来编译，所以换成5.3，然后又有bug。最终我用了7.3.0编译成功的，再试一下8.3.0吧。</li>
    </ul>
  </li>
  <li>
    <ul>
      <li>以上版本都是gcc官方的release</li>
    </ul>
  </li>
  <li>
    <ul>
      <li>有一些坑，我记录在这儿了：源码编译GCC（旧站点文章链接已失效）</li>
    </ul>
  </li>
</ul>

<p>基本需要的依赖都安装完了的话，下边在安装，就十分顺滑了。</p>

<h1 id="安装tensorflow">安装TensorFlow</h1>

<ul>
  <li>配置</li>
</ul>

<div class="language-plaintext highlighter-rouge"><div class="highlight"><pre class="highlight"><code><table class="rouge-table"><tbody><tr><td class="rouge-gutter gl"><pre class="lineno">1
2
3
4
</pre></td><td class="rouge-code"><pre>
    cd tensorflow
    ./configure

</pre></td></tr></tbody></table></code></pre></div></div>

<ul>
  <li>
    <p>说明一下，常规操作一般只需要CPU的话，就无需选择 XLA 选项和CUDA开关，但是一般有GPU加速的需求，就需要按照我的这个配置来。</p>
  </li>
  <li>
    <p>这是一个交互式的脚本文件，所以呢，就是需要填Y或者N，然后也需要填一下 CUDA路径，这根据你所需要的版本来定。</p>
  </li>
  <li>
    <p>仔细看一下我的选择</p>
  </li>
  <li>
    <ul>
      <li>Python 环境，选择了自己的virtual环境</li>
    </ul>
  </li>
  <li>
    <ul>
      <li>XLA 选择Y</li>
    </ul>
  </li>
  <li>
    <ul>
      <li>CUDA的选的10</li>
    </ul>
  </li>
  <li>
    <ul>
      <li>CUDNN选的7</li>
    </ul>
  </li>
  <li>
    <ul>
      <li>CUDA PATH 手动选了/data01/zangchuanqi/workspace/cuda</li>
    </ul>
  </li>
  <li>
    <ul>
      <li>Clang 不选了</li>
    </ul>
  </li>
  <li>
    <ul>
      <li>GCC 选了自定义的7.3.0 /data01/zangchuanqi/gcc-7.3.0/build/install/bin/gcc</li>
    </ul>
  </li>
  <li>
    <ul>
      <li>其他的就default了</li>
    </ul>
  </li>
</ul>

<div class="language-plaintext highlighter-rouge"><div class="highlight"><pre class="highlight"><code><table class="rouge-table"><tbody><tr><td class="rouge-gutter gl"><pre class="lineno">1
2
3
4
5
6
7
8
9
10
11
12
13
14
15
16
17
18
19
20
21
22
23
24
25
26
27
28
29
30
31
32
33
34
35
36
37
38
39
40
41
42
43
44
45
46
47
48
49
50
51
52
53
54
55
56
57
58
59
60
61
62
63
64
65
66
67
68
69
70
71
72
73
74
75
76
77
78
79
80
</pre></td><td class="rouge-code"><pre>
    (tvm.venv) zangchuanqi@myserver:~/workspace/tensorflow$ ./configure
    WARNING: --batch mode is deprecated. Please instead explicitly shut down your Bazel server using the command "bazel shutdown".
    You have bazel 0.24.1 installed.
    Please specify the location of python. [Default is /data01/zangchuanqi/tvm.venv/bin/python]:
    Found possible Python library paths:
     /data01/zangchuanqi/tvm.venv/lib/python3.6/site-packages
     /data01/zangchuanqi/workspace/tvm/topi/python
     /data01/zangchuanqi/workspace/tvm/python
    Please input the desired Python library path to use.  Default is [/data01/zangchuanqi/tvm.venv/lib/python3.6/site-packages]
    Do you wish to build TensorFlow with XLA JIT support? [Y/n]: y
    XLA JIT support will be enabled for TensorFlow.
    Do you wish to build TensorFlow with OpenCL SYCL support? [y/N]: n
    No OpenCL SYCL support will be enabled for TensorFlow.
    Do you wish to build TensorFlow with ROCm support? [y/N]: n
    No ROCm support will be enabled for TensorFlow.
    Do you wish to build TensorFlow with CUDA support? [y/N]: Y
    CUDA support will be enabled for TensorFlow.
    Do you wish to build TensorFlow with TensorRT support? [y/N]: n
    No TensorRT support will be enabled for TensorFlow.
    Could not find any cudnn.h matching version '' in any subdirectory:
        ''
        'include'
        'include/cuda'
        'include/*-linux-gnu'
        'extras/CUPTI/include'
        'include/cuda/CUPTI'
    of:
        '/lib'
        '/lib/x86_64-linux-gnu'
        '/lib32'
        '/libx32'
        '/opt/tiger/ss_lib/so'
        '/usr'
        '/usr/lib'
        '/usr/lib/x86_64-linux-gnu'
        '/usr/lib/x86_64-linux-gnu/libfakeroot'
        '/usr/local/cuda'
        '/usr/local/cuda/lib64'
        '/usr/local/cudnn/lib64'
    Asking for detailed CUDA configuration...
    Please specify the CUDA SDK version you want to use. [Leave empty to default to CUDA 10]: 10
    Please specify the cuDNN version you want to use. [Leave empty to default to cuDNN 7]: 7
    Please specify the locally installed NCCL version you want to use. [Leave empty to use https://github.com/nvidia/nccl]:
    Please specify the comma-separated list of base paths to look for CUDA libraries and headers. [Leave empty to use the default]: /data01/zangchuanqi/workspace/cuda
    Found CUDA 10.0 in:
      /data01/zangchuanqi/workspace/cuda/lib64
      /data01/zangchuanqi/workspace/cuda/include
    Found cuDNN 7 in:
      /data01/zangchuanqi/workspace/cuda/lib64
      /data01/zangchuanqi/workspace/cuda/include
    Please specify a list of comma-separated CUDA compute capabilities you want to build with.
    You can find the compute capability of your device at: https://developer.nvidia.com/cuda-gpus.
    Please note that each additional compute capability significantly increases your build time and binary size, and that TensorFlow only supports compute capabilities &gt;= 3.5 [Default is: 7.0,7.0,7.0,7.0,7.0,7.0,7.0,7.0]:
    Do you want to use clang as CUDA compiler? [y/N]:
    nvcc will be used as CUDA compiler.
    Please specify which gcc should be used by nvcc as the host compiler. [Default is /usr/bin/gcc]:/data01/zangchuanqi/gcc-7.3.0/build/install/bin/gcc
    Do you wish to build TensorFlow with MPI support? [y/N]: n
    No MPI support will be enabled for TensorFlow.
    Please specify optimization flags to use during compilation when bazel option "--config=opt" is specified [Default is -march=native -Wno-sign-compare]:
    Would you like to interactively configure ./WORKSPACE for Android builds? [y/N]: n
    Not configuring the WORKSPACE for Android builds.
    Preconfigured Bazel build configs. You can use any of the below by adding "--config=&lt;&gt;" to your build command. See .bazelrc for more details.
        --config=mkl         # Build with MKL support.
        --config=monolithic      # Config for mostly static monolithic build.
        --config=gdr         # Build with GDR support.
        --config=verbs        # Build with libverbs support.
        --config=ngraph        # Build with Intel nGraph support.
        --config=numa         # Build with NUMA support.
        --config=dynamic_kernels     # (Experimental) Build kernels into separate shared objects.
        --config=v2          # Build TensorFlow 2.x instead of 1.x.
    Preconfigured Bazel build configs to DISABLE default on features:
        --config=noaws        # Disable AWS S3 filesystem support.
        --config=nogcp        # Disable GCP support.
        --config=nohdfs        # Disable HDFS support.
        --config=noignite       # Disable Apache Ignite support.
        --config=nokafka       # Disable Apache Kafka support.
        --config=nonccl        # Disable NVIDIA NCCL support.
    Configuration finished

</pre></td></tr></tbody></table></code></pre></div></div>

<ul>
  <li>编译安装</li>
</ul>

<ol>
  <li>
    <ul>
      <li>Bazel 构建</li>
    </ul>
  </li>
  <li>
    <ul>
      <li>生成wheel包到../work/tensorflow_pkg</li>
    </ul>
  </li>
  <li>
    <ul>
      <li>Pip 安装 到当前环境</li>
    </ul>
  </li>
  <li>
    <ol>
      <li>
        <ul>
          <li>参数说明</li>
        </ul>
      </li>
    </ol>
  </li>
  <li>
    <ol>
      <li>
        <ol>
          <li>
            <ul>
              <li>Opt 使能优化</li>
            </ul>
          </li>
        </ol>
      </li>
    </ol>
  </li>
  <li>
    <ol>
      <li>
        <ol>
          <li>
            <ul>
              <li>Cuda 使能GPU</li>
            </ul>
          </li>
        </ol>
      </li>
    </ol>
  </li>
</ol>

<div class="language-plaintext highlighter-rouge"><div class="highlight"><pre class="highlight"><code><table class="rouge-table"><tbody><tr><td class="rouge-gutter gl"><pre class="lineno">1
2
3
4
5
</pre></td><td class="rouge-code"><pre>
    bazel build --config=opt --config=cuda //tensorflow/tools/pip_package:build_pip_package
    ./bazel-bin/tensorflow/tools/pip_package/build_pip_package ../work/tensorflow_pkg
    pip install ../work/tensorflow_pkg/tensorflow-version-tags.whl

</pre></td></tr></tbody></table></code></pre></div></div>

<ul>
  <li>Have a Test</li>
</ul>

<div class="language-plaintext highlighter-rouge"><div class="highlight"><pre class="highlight"><code><table class="rouge-table"><tbody><tr><td class="rouge-gutter gl"><pre class="lineno">1
2
3
4
5
6
7
8
9
10
11
12
13
14
</pre></td><td class="rouge-code"><pre>
    (test.venv) zangchuanqi@myserver:~$ python
    Python 3.6.9 |Anaconda, Inc.| (default, Jul 30 2019, 19:07:31)
    [GCC 7.3.0] on linux
    Type "help", "copyright", "credits" or "license" for more information.
    &gt;&gt;&gt; import tensorflow as tf
    &gt;&gt;&gt; print tf.__version__
     File "&lt;stdin&gt;", line 1
      print tf.__version__
          ^
    SyntaxError: Missing parentheses in call to 'print'. Did you mean print(tf.__version__)?
    &gt;&gt;&gt; print (tf.__version__)
    1.15.3

</pre></td></tr></tbody></table></code></pre></div></div>

<p>大功告成！</p>

<h1 id="使能xla">使能XLA</h1>

<blockquote>
  <ul>
    <li><a href="https://tensorflow.juejin.im/performance/xla/jit.html">https://tensorflow.juejin.im/performance/xla/jit.html</a></li>
  </ul>

</blockquote>

<p>A. 环境变量设置</p>
<div class="language-plaintext highlighter-rouge"><div class="highlight"><pre class="highlight"><code><table class="rouge-table"><tbody><tr><td class="rouge-gutter gl"><pre class="lineno">1
2
3
4
5
6
7
8
9
</pre></td><td class="rouge-code"><pre>
    # XLA FLAGS
    export XLA_FLAGS="--xla_hlo_profile --xla_dump_to=/tmp/foo --xla_dump_hlo_as_text --xla_dump_hlo_as_dot --xla_dump_hlo_as_html --xla_dump_hlo_as_proto"
    # 输出所有的hlo pass
    export XLA_FLAGS="--xla_hlo_profile --xla_dump_hlo_pass_re=.* --xla_dump_to=./test_dump --xla_dump_hlo_as_dot"
    # log 选项
    export TF_CPP_MIN_VLOG_LEVEL=4
    export TF_CPP_MIN_LOG_LEVEL=0

</pre></td></tr></tbody></table></code></pre></div></div>

<p>B. 代码case</p>

<ul>
  <li><a href="https://github.com/tensorflow/tensorflow/blob/master/tensorflow/examples/tutorials/mnist/mnist_softmax_xla.py">https://github.com/tensorflow/tensorflow/blob/master/tensorflow/examples/tutorials/mnist/mnist_softmax_xla.py</a></li>
</ul>

<p>C. 结果查看</p>

<ul>
  <li>
    <p>生成的图如下</p>
  </li>
  <li>
    <p>优化前的</p>
  </li>
  <li>
    <p>优化后</p>
  </li>
</ul>]]></content><author><name>Chuanqi Zang</name></author><category term="机器学习" /><summary type="html"><![CDATA[TensorFlow 源码编译构建 大型工程编译坑还是太多，这波先把坑给大家踩一踩。]]></summary></entry><entry><title type="html">对于异构计算的几个优化点</title><link href="https://zangcq.github.io/2020/06/15/%E5%AF%B9%E4%BA%8E%E5%BC%82%E6%9E%84%E8%AE%A1%E7%AE%97%E7%9A%84%E5%87%A0%E4%B8%AA%E4%BC%98%E5%8C%96%E7%82%B9/" rel="alternate" type="text/html" title="对于异构计算的几个优化点" /><published>2020-06-15T23:11:12+08:00</published><updated>2020-06-15T23:11:12+08:00</updated><id>https://zangcq.github.io/2020/06/15/post-1350</id><content type="html" xml:base="https://zangcq.github.io/2020/06/15/%E5%AF%B9%E4%BA%8E%E5%BC%82%E6%9E%84%E8%AE%A1%E7%AE%97%E7%9A%84%E5%87%A0%E4%B8%AA%E4%BC%98%E5%8C%96%E7%82%B9/"><![CDATA[<ul>
  <li>计算掩盖IO的延迟
    <ul>
      <li>例如 像 transpose 这种访存相关的操作，我们通过对一个特殊的矩阵乘，进行一次转换，达到transpose的结果，而非从片外存储中，来进行load。</li>
      <li>矩阵分块与合并
        <ul>
          <li>进行与硬件的规格相匹配，例如GPU 中 warp的概念（32 thread 同步执行），shared memory 这种可编程的存储。</li>
        </ul>
      </li>
      <li>计算与load/store流水起来，减少气泡的等待</li>
      <li>充分利用dsp资源，如果有效利用率达到80%以上，那么就已经很成功了。</li>
    </ul>
  </li>
</ul>]]></content><author><name>Chuanqi Zang</name></author><category term="机器学习" /><summary type="html"><![CDATA[计算掩盖IO的延迟 例如 像 transpose 这种访存相关的操作，我们通过对一个特殊的矩阵乘，进行一次转换，达到transpose的结果，而非从片外存储中，来进行load。 矩阵分块与合并 进行与硬件的规格相匹配，例如GPU 中 warp的概念（32 thread 同步执行），shared memory 这种可编程的存储。]]></summary></entry><entry><title type="html">数据类型 char, signed char, unsigned char 的理解</title><link href="https://zangcq.github.io/2020/06/09/%E6%95%B0%E6%8D%AE%E7%B1%BB%E5%9E%8B-char%E3%80%81signed-char%E3%80%81unsigned-char-%E7%9A%84%E7%90%86%E8%A7%A3/" rel="alternate" type="text/html" title="数据类型 char, signed char, unsigned char 的理解" /><published>2020-06-09T23:44:24+08:00</published><updated>2020-06-09T23:44:24+08:00</updated><id>https://zangcq.github.io/2020/06/09/char-signed-char-unsigned-char</id><content type="html" xml:base="https://zangcq.github.io/2020/06/09/%E6%95%B0%E6%8D%AE%E7%B1%BB%E5%9E%8B-char%E3%80%81signed-char%E3%80%81unsigned-char-%E7%9A%84%E7%90%86%E8%A7%A3/"><![CDATA[<p><a href="https://stackoverflow.com/questions/75191/what-is-an-unsigned-char">https://stackoverflow.com/questions/75191/what-is-an-unsigned-char</a></p>

<p>占坑</p>

<p>overview</p>

<ul>
  <li>表示范围</li>
  <li>应用场景</li>
  <li>x86跟arm服务器中默认的数据类型是什么？
    <ul>
      <li>在迁移过程中出现的问题</li>
    </ul>
  </li>
</ul>

<p>错误实例</p>
<div class="language-plaintext highlighter-rouge"><div class="highlight"><pre class="highlight"><code><table class="rouge-table"><tbody><tr><td class="rouge-gutter gl"><pre class="lineno">1
2
3
4
5
6
7
</pre></td><td class="rouge-code"><pre>
    某程序以 char 作为返回值，在x86服务器上测试的时候结果正常。

    但是在arm服务器上测试的时候却出现异常，程序陷入死循环

    ch每次返回的都是255

</pre></td></tr></tbody></table></code></pre></div></div>

<p>原因分析</p>
<div class="language-plaintext highlighter-rouge"><div class="highlight"><pre class="highlight"><code><table class="rouge-table"><tbody><tr><td class="rouge-gutter gl"><pre class="lineno">1
2
3
4
5
6
</pre></td><td class="rouge-code"><pre>
    这个问题的根本原因就是gcc对于不同平台上的char类型定义不一样。

    x86 上的 gcc 都把 char 定义为 signed char；
    而arm64平台上使用的linux-gcc 却把 char 定义为 unsigned char 。所以造成了同样的代码在 X86 和arm平台上编译后执行的结果不一样

</pre></td></tr></tbody></table></code></pre></div></div>

<p>解决方法</p>
<div class="language-plaintext highlighter-rouge"><div class="highlight"><pre class="highlight"><code><table class="rouge-table"><tbody><tr><td class="rouge-gutter gl"><pre class="lineno">1
2
3
4
5
6
7
8
9
10
11
12
13
14
15
16
17
18
19
20
</pre></td><td class="rouge-code"><pre>
    对于这个来说，当然是要把 char ch 修改为 int ch ，因为这个函数本身返回的也是int 。

    但是如果对于那些本来就是char类型的变量怎么办？

    这里也有解决方案，这个可以参考华为之前给出的方案

    1） 在编译时加-fsigned-char 参数，指定 char 为 signed char
    举例： gcc -fsigned-char test.c -o test

    在 Makefile 中可以使用选项 CFLAGS="-fsigned-char"、 CXXFLAGS、 CPPFLAGS 按需
    添加

    2）代码开发时养成良好的编程规范，使用自定义的变量类型，比如代码中定义
    #define unsigned char UCHAR 或者#define signed char CHAR；这样可以跨平台


    3） 修改编译器默认 char 为和 x86 的一致， 可以使用下面版本的 GCC
    gcc4.9.3_signedchar.rar

</pre></td></tr></tbody></table></code></pre></div></div>]]></content><author><name>Chuanqi Zang</name></author><category term="C/C++" /><summary type="html"><![CDATA[https://stackoverflow.com/questions/75191/what-is-an-unsigned-char]]></summary></entry><entry><title type="html">ARM CRC32 指令加速</title><link href="https://zangcq.github.io/2020/05/17/arm-crc32-%E6%8C%87%E4%BB%A4%E5%8A%A0%E9%80%9F/" rel="alternate" type="text/html" title="ARM CRC32 指令加速" /><published>2020-05-18T01:00:01+08:00</published><updated>2020-05-18T01:00:01+08:00</updated><id>https://zangcq.github.io/2020/05/17/arm-crc32</id><content type="html" xml:base="https://zangcq.github.io/2020/05/17/arm-crc32-%E6%8C%87%E4%BB%A4%E5%8A%A0%E9%80%9F/"><![CDATA[<h2 id="crc32是什么">CRC32是什么？</h2>

<ul>
  <li>A cyclic redundancy check 32(CRC32)</li>
  <li>32 位的循环冗余检查</li>
  <li>第一次接触是在计算机网络的课上，用于<strong>网络传输</strong> 的数据校验</li>
  <li>工作上是在数据库这种<strong>数据存储</strong> 的场景</li>
</ul>

<p>功能与性能</p>

<ul>
  <li>从其检错能力来看，它所不能发现的错误的几率仅为0.0047%以下。</li>
  <li>
    <p>从性能上和开销上考虑，均远远优于<a href="https://baike.baidu.com/item/%E5%A5%87%E5%81%B6%E6%A0%A1%E9%AA%8C">奇偶校验</a>及算术和校验等方式。</p>
  </li>
  <li><a href="https://baike.baidu.com/item/CRC/1453359">https://baike.baidu.com/item/CRC/1453359</a></li>
  <li><a href="https://baike.baidu.com/item/CRC32">https://baike.baidu.com/item/CRC32</a></li>
</ul>

<p>CRC算法原理</p>

<p><img src="https://bkimg.cdn.bcebos.com/pic/a50f4bfbfbedab64928a2448f036afc378311eb9?x-bce-process=image/watermark,g_7,image_d2F0ZXIvYmFpa2U2MA==,xp_5,yp_5" alt="" /></p>

<ul>
  <li>D（数据） 是一个待校验的长度为 k 的比特t流</li>
  <li>数据D后添加(n-k)比特冗余位(又称帧检验序列，Frame Check Sequence，FCS)</li>
  <li>
    <p>形成n比特的传输帧T，再将其发送出去。</p>
  </li>
  <li>循环冗余校验提供一个预先设定的(n-k+1)比特整数P，</li>
  <li>并且要求添加的(n-k)比特F满足：<strong>T mod P == 0</strong> （T对P取余=0）</li>
  <li><strong>其中 T =2 n-kD + F</strong> （D左移n-k 位 + F）</li>
</ul>

<p>基于上述要求，实际应用时，发送方和接收方按以下方式通信：</p>

<p>1. 发送方和接收方在通信前，约定好预设整数P。</p>

<p>2. 发送方在发送前根据数据D确定满足(1)式的F，生成CRC码 T，T 即为数据位D与校验位F的拼接，发送T。</p>

<p>3. 接收方收到CRC码 T，进行 result = T mod P 运算，当且仅当result = 0时接收方认为没有差错。</p>

<p>模二运算采用无进位的二进制加法，恰好为异或(XOR)操作</p>

<ul>
  <li><strong>F</strong>=** 2n-kD mod P**eg</li>
  <li>P=1010 （自己编的）</li>
  <li>D=1100</li>
  <li><strong>F</strong> = <strong>1100 000</strong> mod <strong>1010</strong> = 110</li>
  <li>T=1100 110</li>
</ul>

<p>CRC的本质是模-2除法的余数，采用的除数不同，CRC的类型也就不一样。通常，CRC的<strong>除数用生成多项式来表示</strong> 。最常用的CRC码的生成多项式如表1所示。最常用的CRC码及生成多项式名称生成多项式</p>

<p><strong>自定义除数</strong></p>

<p><em>(Legacy image unavailable; original hosted on old site.)</em></p>

<h2 id="查看-arm-硬件支持">查看 ARM 硬件支持</h2>

<p><em>(Legacy image unavailable; original hosted on old site.)</em></p>

<p>cat /proc/cpuinfo</p>

<p>如果对应feature 存在，那么就可以使用了crc32硬件指令加速，编译器的作用，实际上就是一个enable 硬件feature的过程。</p>

<h2 id="使能crc32-arm-instruction">使能CRC32 ARM Instruction</h2>

<p>https://www.jiangwei.org/2016/04/25/armv8-crc32%E6%8C%87%E4%BB%A4%E9%9B%86%E6%B5%8B%E8%AF%95/</p>

<p>android 实现：<a href="https://blog.csdn.net/lyx2007825/article/details/77113256">https://blog.csdn.net/lyx2007825/article/details/77113256</a></p>

<p>添加 intrinsic</p>

<p>d 代表 double ：__crc32cd: 一次完成8个Byte的CRC32C计算，对应crc32cx指令。</p>

<p>w 代表 word ：__crc32cw：一次完成4个Byte的CRC32C计算，对应crc32cw指令。</p>

<p>h 代表 half： __crc32ch：一次完成2个Byte的CRC32C计算，对应crc32ch指令。</p>

<p>b 代表 byte：__crc32cb: 一次完成1个Byte的CRC32C计算，对应crc32cb指令。</p>

<p>添加对应编译选项</p>
<div class="language-plaintext highlighter-rouge"><div class="highlight"><pre class="highlight"><code><table class="rouge-table"><tbody><tr><td class="rouge-gutter gl"><pre class="lineno">1
2
3
</pre></td><td class="rouge-code"><pre>
    -mcpu=cortex-a72+crc
    -mcpu=generic+crc
</pre></td></tr></tbody></table></code></pre></div></div>

<p>difference of CRC32 and CRC32C</p>

<ul>
  <li>F 取值不一样
    <ul>
      <li>CRC32 ： 0x04C11DB7; its reversed form 0xEDB88320</li>
      <li>CRC32C (0x1EDC6F41, reversed 0x82F63B78)</li>
    </ul>
  </li>
  <li>CRC32 在Intel CPU 上，有加速效果，本来3 cycle 计算 32bit，现在一个cycle就可以完成。</li>
</ul>

<p><a href="https://stackoverflow.com/questions/26429360/crc32-vs-crc32c">https://stackoverflow.com/questions/26429360/crc32-vs-crc32c</a></p>]]></content><author><name>Chuanqi Zang</name></author><category term="通用编译技术" /><summary type="html"><![CDATA[CRC32是什么？]]></summary></entry><entry><title type="html">NVIDIA Ampere Architecture 分析</title><link href="https://zangcq.github.io/2020/05/17/nvidia-ampere-architecture-%E5%88%86%E6%9E%90/" rel="alternate" type="text/html" title="NVIDIA Ampere Architecture 分析" /><published>2020-05-17T19:39:59+08:00</published><updated>2020-05-17T19:39:59+08:00</updated><id>https://zangcq.github.io/2020/05/17/nvidia-ampere-architecture</id><content type="html" xml:base="https://zangcq.github.io/2020/05/17/nvidia-ampere-architecture-%E5%88%86%E6%9E%90/"><![CDATA[<p>官方博客</p>

<p><a href="https://devblogs.nvidia.com/nvidia-ampere-architecture-in-depth/">https://devblogs.nvidia.com/nvidia-ampere-architecture-in-depth/</a></p>

<p>知乎讨论</p>

<p><a href="https://www.zhihu.com/question/394863138">https://www.zhihu.com/question/394863138</a></p>

<p>个人观点</p>

<p>知乎回答</p>

<ol>
  <li>7nm工艺下 108/128 的良品率还是挺高的</li>
  <li>单SM，FP32/INT32/FP64 没有变化，单个Tensor Core 从 4<em>4</em>4 变为 4<em>8</em>8 的计算核心，并且增加了硬件稀疏化的功能，这个确实令人佩服。L1 cache又加了几十KB。</li>
  <li>单GPU， MIG这个功能总算盼到了，云厂商的虚拟化工作应该更容易做了，L2 Cache扩到 40M 来服务于 108个SM</li>
  <li>多GPU互联，NVLINK 3.0，不太懂互联技术，感觉带宽提高了</li>
  <li>CPU-GPU互联，PCIE 4.0 的升级; 确实很多情况都是IO的瓶颈</li>
  <li>6显存HBM2 接口没变化，容量增大到40G</li>
  <li>其实，首先想到的是，互联网自研芯片，可能只是为了有跟nv议价的能力，但是像A100这种全能选手，平头哥含光800 好像不是一个公斤级的了。</li>
</ol>

<p>一些有趣的观点</p>

<p>夏晶晶，很早关注的，<del>应该是计算所的老哥。</del> ，海思的大佬，升腾、鲲鹏的芯片架构师，牛笔！</p>

<p><a href="https://www.linkedin.com/in/%E6%99%B6-%E5%A4%8F-49a9a5123/">https://www.linkedin.com/in/%E6%99%B6-%E5%A4%8F-49a9a5123/</a></p>

<ul>
  <li>首先肯定了 A100 是 AI 炼丹神器</li>
  <li>其次讲了 NV 在 HPC (高性能计算领域) 的出局，（这个本人不了解）</li>
  <li>最后讲了 如 Intel Amd 华为的等公司将在HPC领域的崛起</li>
</ul>

<p>其实我们要从NV架构的历史看待这个问题的话，就容易理解这次新的升级了。</p>

<ul>
  <li>7nm 工艺的红利，
    <ul>
      <li>更高的集成度 540 亿晶体管，826 mm2 ！</li>
    </ul>
  </li>
  <li>面向热门应用的芯片设计，由近及远
    <ul>
      <li>Ampere，Turing，Volta ：加持了Tenor Core 一个专门为做矩阵乘的ASIC，很明显就是为了Deep Learning 类的应用做的</li>
      <li>Pascal，Maxwell，Kepler，Fermi ： 主要以CUDA Core 用于 FP32/FP64, 主要解决的问题是 通用计算，也就是以前 CPU 干的活</li>
      <li>Tesla 之前的架构， 其实并没有进入 计算领域，主要用作图像的显示，也就通俗讲的消费级显卡。处理pixel</li>
    </ul>
  </li>
  <li>系统级别的全面优化
    <ul>
      <li>从GPU之间的互联，Nvlink ，nvswitch</li>
      <li>与CPU的互联技术，PCIE</li>
      <li>显存的接口，协议，增加带宽。</li>
    </ul>
  </li>
</ul>

<p>显而易见，NV明显吃到了深度学习的这波红利，并且押宝自动驾驶这个方向，所以夏总说，放弃了HPC也是正常的现象。因为体系结构，除非有突破性的变革，那就只能一点一点挤牙膏了，让单位面积的晶体管，发挥出他的最大能效。</p>]]></content><author><name>Chuanqi Zang</name></author><category term="GPGPU" /><summary type="html"><![CDATA[官方博客]]></summary></entry></feed>